![Main image for the article [Learning To Like: Beets!]. Pictured is a beet smoothie, some whole beets and some beets cut into cubes.](https://mylittleeater.com/wp-content/uploads/2020/05/New-Blog-Post-Image-Size-8-300x300.png)
This blog post was written three years ago and was originally featured on my old website. My boys were 8 and 7 years old, and I decided to re-post it here to show you some of the things I was experimenting and dealing with, at the time. The quality of the pictures aren’t great (thanks old iPhone), but the tips in the post will help nonetheless!
Exposure Activity #1 – Beet Smoothie
Today marks day 1 of my intentional plan to get beets to be an accepted food at home. Beets are one of those foods that my husband and I love, but we rarely have it in the home for some reason. It’s likely because they are so messy! So, the thought of having to peel and cook beets with red stains on my hands, and counter-top, just seems too much for me to think about when I’m contemplating buying them at the grocery store. But when I saw these peeled and cooked beets from LoveBeets at my local Costco, it got me thinking about how this would be a perfect way to make them a more regular occurrence at home. I knew my kids weren’t a fan of them, but also knew that they just hadn’t been exposed to them enough times for me to say that they truly didn’t like them.
On another note, I’ve been asked frequently over the past few weeks about how to encourage kids to try a food without necessarily saying “take a bite”. I’ve written before about some ways you can bypass this phrase, and encourage interaction and exposure to a food at the dinner table using other phrases, but I wanted to show parents how you also can use different cooking methods and exposure via activities OUTSIDE of the dinner table to encourage food tasting. The key is in generating enough curiosity and familiarity on all levels (touching, smelling, licking, etc.) – not just biting or eating food.
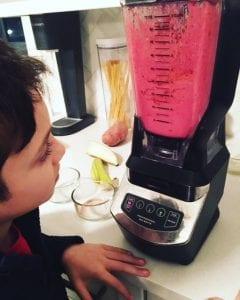
I wanted to start with a recipe that was familiar to them and non-threatening, so I chose to begin with using beets in a smoothie. I knew they would find this exciting to make, look at, and taste, as I’ve seen a variation of this recipe before and even I was fascinated by the bright colour that the smoothie turns with the red beets added. Smoothies are a great way to mask ingredients among other flavours. You can ease your children into the taste of the new ingredient by adding in small quantities at first, and gradually increasing it over time once they are comfortable with the thought of eating it.
Alright – let’s get to the recipe, procedure, and their reactions – shall we?
I started off by letting the kids know in the morning that in the afternoon we were going to be making a new smoothie recipe, and I wanted them to help. A little heads up in advance never hurts. When the time came to make the smoothie, my youngest wasn’t wanting to help, but I told him that this was a planned activity of my choice, and I would really need his help because it was a new recipe.
We began reading the instructions I wrote out for them, and they gathered the ingredients. Here they are below:
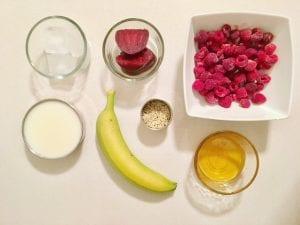
- 1/2 cup ice
- 1 cup cow’s milk or almond milk
- 1 banana
- 1 tbsp. hemp seeds
- 1 medium sized beet
- 1 1/4 cup frozen raspberries
- 2-3 tbsp. Honey
Here were their initial reactions:
I opened up the package of beets and immediately their comments were: “Oh the smell!” and “It smells disgusting!” I continued to press on and ignored the comments. If you learn anything from me, remember this: don’t make a big deal out of their commentary and reactions! Neutral and nonchalant is best.
I licked the juice that fell on the cutting board and said: “It tastes sweeter than I expected.” This was deliberately done to get them curious about the taste, and prime them to know what to expect from the flavour. Worked like a charm. Naturally, they became curious and tasted as well. Thomas didn’t like it. I could tell Jonah wanted to copy his brother and say he didn’t like it as well, but instead he said “hmmm.” I could tell he liked it more but didn’t want to admit it just yet. I asked them each to tell me what it smells like, tastes like, and feels like. They’re used to me asking these questions at mealtimes, especially anytime we try something new. Read more about food exploration in this blog post here.
They each approached the beets and touched one with their pointer finger quickly, and then removed it. They didn’t get much of a feel for what the texture was really like, so I asked them to cut through it with a knife and see if they could determine the texture of the inside that way. They each did so, and declared it to be “soft” with no other comment. Cool. Moving on.
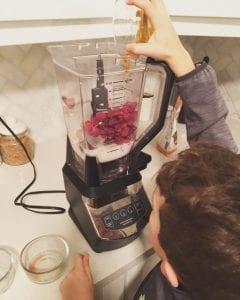
We began to assemble the ingredients into the blender. When it came time for the hemp seeds (another food I’m working on them accepting better), I asked them again to tell me what it smells like. Thomas (who has had more exposure to hemp seeds than Jonah) said it smelled plain… then changed his mind to say it smelled sweet. I could tell he was overall neutral on this food. When it was Jonah’s turn, he said “Smells like barf!” (insert eye-roll here). I knew that he was being dramatic, and didn’t really think it smelled like that. I took a deep breath, and I asked him to be serious for one second and actually tell me what it smells like. He revised his answer and said it smelled “plain” as well…followed by…“I don’t like plain” (insert another eye-roll here). I responded by saying, “Hmm.. I’m assuming that since it’s plain smelling that you probably can’t taste it in a smoothie!” They both agreed.
Next, they each poured the remaining ingredients into the blender, and “oohed” and “ahhed” as they watched how it turned pink. I asked them what ingredient they thought made it that pink – “The beets!” they responded. They remembered the facts I told them about how it stains hands, clothes, and everything, pink. Remember that forever, kids. It stains EVERYTHING.
Taste test time…
They LOVED it!
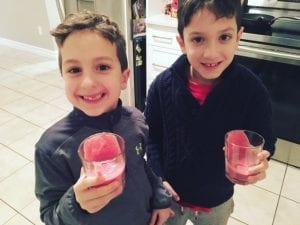
They said they could taste a bit of the beets, but that it was good because it wasn’t strong. Excellent. Exposure #1 complete.
Key take-aways:
Get them curious about the process of cooking or making a recipe, and get them experienced with describing flavours, textures, and other meaningful characteristics of a food. Sometimes they talk themselves in and out of liking something, but with a little direction and reasoning on your end, they see that sometimes what they like or don’t like is just a frame of mind! DO NOT engage them in an argument by trying to convince them that they DO actually like something, or something isn’t actually gross. Just acknowledge and move on like it’s nothing. Also, move tasting activities away from the dinner table from time-to-time and incorporate them as part of general family activities. Kids usually approach and taste food with less apprehension if it’s built into a hands-on activity, versus presented as dinner to eat. Finally, although this was one activity, they had multiple exposures. Each time they touched and smelled and tasted it, counted as an exposure. Overall, it was a positive, non-pressuring experience, so I’d call it a success for sure!
I let them know that next week we would be making beet tattoos and beet chips together so that we could experiment with other ways to use beets.
Alrighty! On to the next few exposures of my “Learning to Like Beets” challenge.
I decided to try three new recipes: beet & quinoa burgers, beet chips & beet hummus. All three recipes I chose based on the fact that they like the “original” versions of these foods (hamburger/veggie burgers, potato chips & plain hummus). I use the concept of food chaining, which is something I talk about in my Feeding Toddlers online course. This involves changing one property of these already loved foods – so it’s not SO different, which may lure them in, if you will, to trying the beet flavoured version of these recipes. I spread the recipes out over a period of three weeks (one per week) and had them involved in the cooking process in 2 of the 3 recipes. I will note that because I had them there for only 2 of the recipes, there was a difference in how many times they repeatedly tasted the food during, and after, the cooking process when they helped with the recipe vs. when they did not. So basically…try to get them in the kitchen as often as you can!
Exposure Activity #2 – Beet Chips
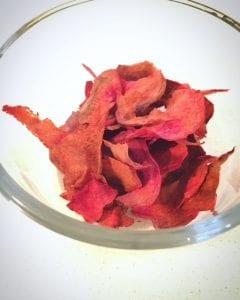
After many (many) trial and errors trying to perfect the beet chip – I finally got it to work. The key? In short, using raw beets, salting and drying them out really well, vs. using pre-peeled and cooked LoveBeets from Costco which were too wet and ended up burning when baking in the oven.
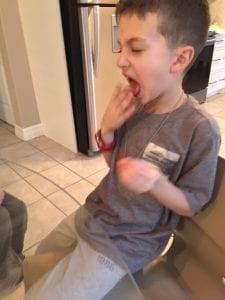
When making these chips, the kids helped me peel the beets and went crazy over the red stains on their hands. They didn’t like it at first, until I told them that they could use them to try to make tattoos after we were done. They agreed. YES to the fun factor! They helped me slice the beets with a slicer, salt them, pat them dry after about 20 min, and then lay them out on the pan to bake. When done, they looked excited that they turned out looking thin and curled like real chips! They each eagerly took in two chips in their mouths at once. Thomas went from a happy “Mmm!!” to a soured “ugh” face in a matter of 5 seconds.
Main comment: too “beety!” Aka…the flavour of beet was too strong.
Then I asked this simple question…
“Does it taste better at the beginning, middle, or end?”
This is a strategy I use to get them focused off of the “I don’t like it factor” (we got that part) to analyze the actual taste of it, hold it in their mouth, and make a decision as to what it tastes like the longer they chew it. Teaching kids to TASTE a food and get really mindful about it is a wonderful skill for them to learn.
Thomas said he thinks it tasted better in the beginning, and proceeded to try it two more times. Jonah said “NEVER!”, after promptly making this face below:
I ate the rest of the chips, and then quickly grabbed the other half of the beet sitting on the counter. I showed them how it stained my hands and told them: “Okay, now let’s try and make beet tattoos with the rest of it!” We boiled the rest and used a cookie cutter to make a shape into the beet, pressed it against our skin and…well…I don’t know how people did it on all those other blogs – but they didn’t work for us. The stain didn’t take in any particular shape on our skin – just sort of formed a pink blob shape. They laughed at me and we all moved on.
P.S. In case you’re wondering, this was a messy and exhausting kitchen activity. By the end of it I was like NEVER AGAIN and cursing the day I ever decided to do a kitchen activity like this. But, if you ever find yourself in this position, do yourself a favour and get some rest, sleep on it, then remind yourself that Edwena says that this stuff is worth it in the long run and you just need a little TLC! Okay?
Exposure Activity #3 – Beet Burgers
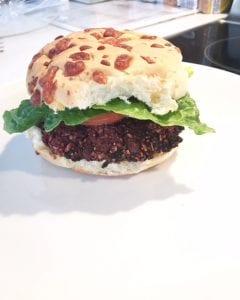
These beet burgers from Wendy Polisi sure looked like a winner to me. They were made with a mixture of chickpeas and quinoa, and the patty was surrounded by lots of filling and a big fluffy bun. I figured that even if my kids didn’t love the flavour on it’s own, any strong beet taste would be masked by the other components of the burger.
Well – maybe it was the fact that they didn’t help me make this recipe – but they did not like this one bit! My little guy dug in with a huge bite, with high hopes that he would like it, and immediately spit it out into a trash can. They both refused to try any more, so I responded with “No problem – maybe next time!” They each chose to pick apart the burger and eat it once deconstructed (just the parts they liked). As I always say, you can’t win every time. Count it as an exposure accomplished, and move on!
Exposure Activity #4 – Beet Hummus
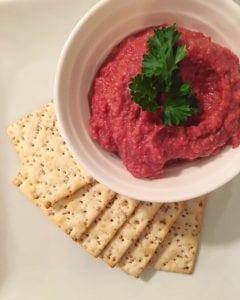
The last recipe was this beet hummus from Jessica in the Kitchen. It was made together with the kids about a week after their exposure to beets via the beet burger, and this time, they helped me with opening up the can of chickpeas, peeling and cutting the beet, and adding the remaining ingredients to the food processor. It was a super quick one to make, which was nice. I set it out with some crackers and told them to go to town.
Guess what?
They. Loved. It.

They still recognized the “beet” flavour, but with some lemon juice and garlic to cut through the taste, it worked fantastically. They only ate a couple of bites with the hummus actually on a cracker, as they said it was enough beets. I asked them – “Would you like it better if it was on something other than a cracker?” They said: “Yes… croutons!”
I didn’t mind. I pulled out some pre-made croutons, and although it was hard to dip into the hummus, as they were so small, they gobbled it up.
Score!
Surprise Exposure…Raw Beets!
As I asked the boys to help me clean up in the kitchen after making the beet hummus, something unexpected happened. Jonah picked up a piece of leftover beet on the cutting board, and took a little lick. He then proceeded to take the tiniest little nibble and proclaimed: “It tastes like nothing!”
Who knew that a food that tasted like “nothing” could sound so amazing!
Naturally, Thomas followed suit and gave the raw beet a try. “Yeah.. tastes like nothing!” By nothing, I’m sure what they meant was mild, but it’s interesting how that root-y, beet-y flavour was toned down in the raw form without having to mask it with any other food, and ALSO how awesome it was that they tried it on their own without me even saying a word! Of course, I was slightly pissed that I had to go through all those elaborate recipes first before discovering that raw beet on it’s own would’ve done the trick 😛 And then I thought…but you know what? If they had seen the raw beet on it’s own and NOT gone through those previous, positive exposures with the beet recipes, then liking the simple, seemingly mild taste, of the raw beet may not have happened at all.
It’s just as I tell my clients…the chances that they will try (and like) new foods go WAY up the more they are exposed to it, and being in the kitchen is the PERFECT place to get them exposed to it with their five senses in a non-pressured way!
I hope this documenting process has helped you all to see how this can work in your home as well. It’s taken 5 very deliberate exposure activities (with many different positive tactile exposures within each one) to get them to become accustomed, and open, to eating beets in certain formats. I know that with continued exposure and a low-pressure environment, the current way they accept beets will continue to expand and evolve. I just can’t give up, and need to commit to myself to continue incorporating it into our menus. After all, research shows that it takes 10-30 times of repeated exposure before a food is accepted….but really… I say stop counting and just keep on exposing. So keep at it!
If you’re looking for help or ideas on how to implement an ‘expose and explore’ philosophy in your home, check out my Feeding Toddlers online course! It takes you through the ins and outs of not only what to feed your toddler…but HOW to as well. If you like the tips outlined in this blog post, you’ll love the full picture approach to raising a healthy and adventurous eater. I give you tangible strategies and a step-by-step plan to prevent and manage picky eating and unwanted mealtime behaviour.
You’ll love it!