How to help your baby pick up slippery foods (baby led weaning hack)

Eating is a skill that babies have to learn and it requires a lot of practice, just like all the other developmental milestones your baby has to master in their first year of life. 

Baby led weaning can be challenging for many babies in the beginning. They have to learn how to pick up food with their tiny hands, hold on to it without dropping it, navigate that piece of food all the way to their mouth (again without dropping it), and finally take a bite. And if a food is slippery – add in a few drops and pick it back ups to that list!

That’s why we’re giving you the best tips on how you can make those slippery baby led weaning finger foods easier for your baby to pick up and hold on to so they can get it to their mouth without dropping it (and without you jumping in to “save” them)! 

So, let’s slide into all of the details!

For ultimate confidence in how to feed your baby from 6-12 months of age, join our Baby Led Feeding online course! This expert-led, video-based course teaches you all about starting solids with the feeding method that’s best for you and your baby. You’ll learn how to progress through a variety of textures in a timely way, prevent picky eating, serve all food safely, and raise a food-loving baby!

Plus – it includes our Texture Timeline™ video library! Easily search for any food and find a video for exactly how to serve it according to age and phase! We’re continuously adding to this video library and we’ll soon have more than 100 food videos!

Table of Contents

What are the most slippery foods for BLW?

Baby led weaning slippery food modified to help baby pick it up at 6 months.

Babies can safely eat baby led weaning finger foods when they show all of the developmental signs of readiness around 6 months of age. Many parents are worried about jumping right into finger foods with more intimidating textures like meat and prefer to start with ultra-soft finger foods like very soft ripe fruit or cooked vegetables. 

Since these common first foods are typically super soft and squishy, they can also be extremely slippery and hard for your baby to pick up and hold when they’re first learning how to eat. To help minimize baby getting frustrated when they can’t pick up and hold these foods (and to keep mealtimes positive), you may want to consider modifying the following slippery foods: 

  • Banana
  • Avocado 
  • Eggs
  • Kiwi
  • Mango
  • Strawberries
  • Peaches
  • Plums
  • Apricots 
  • Watermelon
  • Oranges 
  • Cooked apples
  • Beets  
  • Pasta
  • Tofu

Let’s explore how you can make these slippery baby led weaning finger foods easier for your baby to pick up and hold on to so they can get them to their mouth without dropping them!

How to help baby hold slippery finger foods

Baby struggling to hold blw slippery food in hands with concerned look.

Nothing is more frustrating for your baby when they’re hungry than not being able to eat fast enough (or at all) because food keeps falling out of their hand. Here’s how you can make those slippery baby led weaning finger foods easier for your baby to pick up and hold on to so they can get it to their mouth without dropping it!

Tip #1: Add a nutritious coating

Add a nutritious coating to blw slippery foods like avocado wedges.

Although slippery foods offer many beneficial nutrients for baby, fruits and veggies like the ones we mentioned earlier don’t contain much iron (if any at all). Babies need a LOT of iron, so we really want to focus on ways to boost the iron content of foods as much as possible! Rolling slippery foods in a coating like wheat germ, powdered baby cereal fortified with iron, flaxseed meal, or wheat bran is an easy way to give a bit of an iron boost at every meal. 

When choosing a coating for BLW slippery foods, be mindful and try your best to avoid or limit foods that contain added salt or sugar, like store-bought breadcrumbs and sweetened shredded coconut.

DIETITIAN APPROVED COATINGS

  • Hemp hearts 
  • Flaxseed (ground)
  • Chia seeds
  • Almond, peanut, coconut, oat and buckwheat flour 
  • Unsweetened shredded coconut   
  • Iron-fortified infant cereal 
  • Wheat germ
  • Nutritional yeast
Roll slippery foods in nutritious coatings, like banana in flaxseed, for baby led weaning.

FOOD PAIRINGS BABY WILL LOVE

  • Avocado + hemp seeds 
  • Banana spears + peanut flour 
  • Boiled egg slices or wedges + flaxseed meal
  • Broccoli florets + iron-fortified infant cereal 
  • Tofu strips +  ground-hulled sesame seeds 
  • Pasta + nutritional yeast 
  • Ripe fruit (mango spears, peach wedges, kiwi, watermelon, thinly sliced strawberries, or supremed oranges) +  unsweetened shredded coconut 

Tip #2: Use a crinkle cutter

You can use a crinkle cutter to create shapes that allow babies to have more grip on slippery finger foods. The jagged edges of the crinkle cutter will give baby a better shape to hold onto, allowing them to pick up food and navigate it to their mouth without dropping it.

Fruits and vegetables cut using a crickle cutter for baby led weaning, including avocado, carrots, and potatoes.

Use the crinkle cutter as you would use a knife, slicing foods in appropriate finger shapes for baby led weaning. You can do this with ripe fruits, roasted or steamed vegetables, boiled eggs, omelets, tofu, toast, etc.! To provide additional grip and a nutritional boost, combine the two methods, and roll the crinkle-cut finger food in a nutritious coating. 

Check out our favorite crinkle cutters in our Amazon shop, here

Tip #3: Leave the skin on when possible

Banana pop on a plate; a banana with part of the skin on for grip when starting baby led weaning at 6 months.

Leaving the skin on fruit and veggies can really help to provide extra grip for your baby to hold onto it more easily. There are even some foods that can be served in a way that provides a natural handle for your baby to grip and hold onto them.

For instance, bananas can be cut in half horizontally, and then peeled only ⅓ of the way down, leaving an exposed edible portion and the covered bottom portion that acts as a natural handle for baby to hold onto (as shown in this video here). We call these banana pops! 

Avocados and kiwi can be served in wedges or whole, with the top half being partially peeled, and the bottom half having some skin still remaining. These fruits naturally have a very textured outer skin that gives baby a place they can hold onto, while still having the other half exposed to be able to take bites.

Watermelon can be served in a wedge shape with the rind still remaining on the bottom of the wedge, which can be used as a handle for grip. 

To minimize the risk of choking, only use this method with foods that either have thick skin that baby can’t bite through – or – watch your baby carefully and replace it with a new piece if they start biting the skin and breaking pieces off.

We show you exactly how to modify and serve these foods safely inside our Texture Timeline™ video library within the Baby Led Feeding online course.

Thoroughly wash fresh vegetables before serving them to babies, especially if keeping the skin on for grip.

Note: Always thoroughly wash the skin of fruit and vegetables before serving them to your baby, even if it’s not something you’d typically worry about with food like a banana for example. Although your baby won’t be eating the peel, their mouth and hands will still be touching it, so you’ll want to be sure any residue or bacteria is removed. 

Tip #4: Bigger is often better

For the most part, bigger and longer pieces of food are a lot easier for your baby to pick up and hold in the beginning! This is because babies only have their palmar grasp at 6 months of age, and it isn’t until about 8-9 months that they develop their pincer grasp. Meaning, it’s physically very difficult and nearly impossible for them to pick up tiny bite-sized pieces of food for the first few months of their solids journey.

Image with descriptions differentiating between palmar grasp and pincer grasp.

To make finger foods easy for your baby to pick up and hold, they should be about 1-2″ wide, and the length of an adult finger. 

This makes it easy for baby to successfully handle with their palmar grasp. Try to aim for a shape that’s big enough that it sticks out from either end of your baby’s palm. It can be wedge-shaped, disc-shaped, log-shaped, or various other shapes. 

Foods prepped in various shapes for baby led weaning including roasted veggies like red pepper, mushrooms, green beans, and sweet potato.

Knowing when it’s ok to serve food in larger pieces, and what shape is safe to serve them in, can sometimes be tricky. That’s why we created our Texture Timeline™ video library (inside the Baby Led Feeding online course). It allows you to search for any food and see on video how to serve it safely. 

Note: Once your baby has mastered their pincer grasp, it doesn’t mean you have to stop offering finger-shaped foods. It’s best to alternate how foods show up to ensure baby is being exposed to familiar food in different shapes and sizes.

Tip #5: Serve food in a bowl or a high-rimmed plate

High-rimmed plate to help baby pick up food at 6 months.

Our final tip to make food easier for your baby to pick up is to serve slippery finger foods in a bowl or a plate with high edges (rims). This is better than serving it directly from your baby’s high chair tray.

The high edge serves as a support “wall” that baby can scoop and press the food up against, “raking it” up the side of the rim and into their hands. This is much easier to do than trying to pick it up from a flat position on their tray.

Are slippery foods a choking hazard for baby?

Are slippery foods a choking risk for baby led weaning? Baby with wide eyes and appears to be gagging.

Slippery foods can be a choking hazard for babies if they’re not prepared and served safely. 

Small pieces of ripe and slippery fruits can be choking hazards for babies, as their slippery nature makes them hard to control in the mouth. An example would be small pieces of orange segments. It’s also easier to lose track of small slippery pieces of food in the mouth, especially as a new eater. This increases the risk that your baby swallows the food whole, without biting down to smush it first. 

That’s another reason why you want to give babies larger finger foods in the beginning. They will be harder to lose track of and are more likely to trigger a gag reflex (which is a good thing because it prevents choking). They’re also easier for baby to spit out if needed, rather than struggle with locating and spitting out tiny bite-sized pieces.

What if my baby won’t pick up food?

Teach baby to pick up food. Baby in a high chair trying to pick up a finger food with palmar grasp.

Eating is a skill that has to be learned and babies need a lot of practice! Every baby reaches milestones at a different rate. So while some babies may be able to pick up a slippery piece of avocado and gobble it up at 6 months of age, other babies may not get the hang of it until closer to 8 months of age, or beyond. Both of those scenarios are normal and ok!

The most important thing to remember is that you want to make sure you’re allowing them to practice every day with the foods that are reasonable for their current skill set.

How to teach baby to pick up food

Baby trying to hold and eat a slippery banana during baby led weaning.

You can make it easier for your baby to learn to pick up food by holding a large piece of food in their line of vision. Allow them to reach out and take the food directly from your hand. This method will be a bit easier for them compared to placing finger foods on their highchair tray or plate.

Another tip is to sit and eat with your baby during mealtimes, as babies learn to eat by watching you eat. If you can, eat what they’re eating (or at least eat something in front of them) so they can watch you pick up food and mimic what you do. Allowing babies to participate in family meal times not only helps them learn how to eat but also allows you to model healthy eating behaviors in general.

Include family meals in your routine for baby to learn to pick up food by watching you. Baby eats sweet potato with mom.

If you have been providing opportunities for them to practice at each meal and they still aren’t getting the hang of it, take some time to practice away from mealtime by grasping and holding toys during playtime.

If you have a baby that refuses to self-feed altogether, know that some babies may not want to self-feed until closer to 8 months of age. You can still practice baby led feeding by introducing purees and spoon-feeding, while simultaneously offering finger foods and preloaded spoons. That way it’s available when they do become interested in self-feeding.

Do you want to learn how to healthily and safely feed your baby from 6-12 months of age? Join the Baby Led Feeding online course! You’ll get access to all the in-depth, research-backed info for starting solids in one place, including our signature Texture Timeline™ tool to help you move from purees to more advanced textures and finger foods at your own pace.

Our bite-sized videos will provide you info on gagging, choking, allergenic foods, balancing baby’s plate, and more, with resources to support you along the way for ultimate confidence in raising a healthy eater.

The My Little Eater Baby Led Feeding online course for starting solids.
Easy apple cinnamon wedges with almond flour recipe by My Little Eater

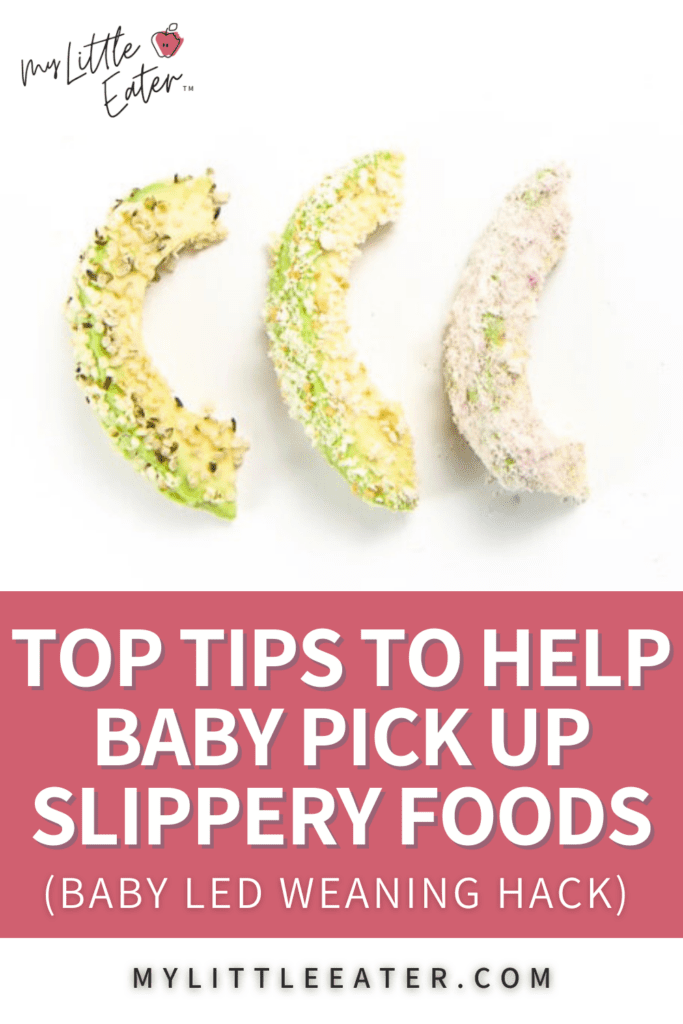
Apple cinnamon wedges with almond flour

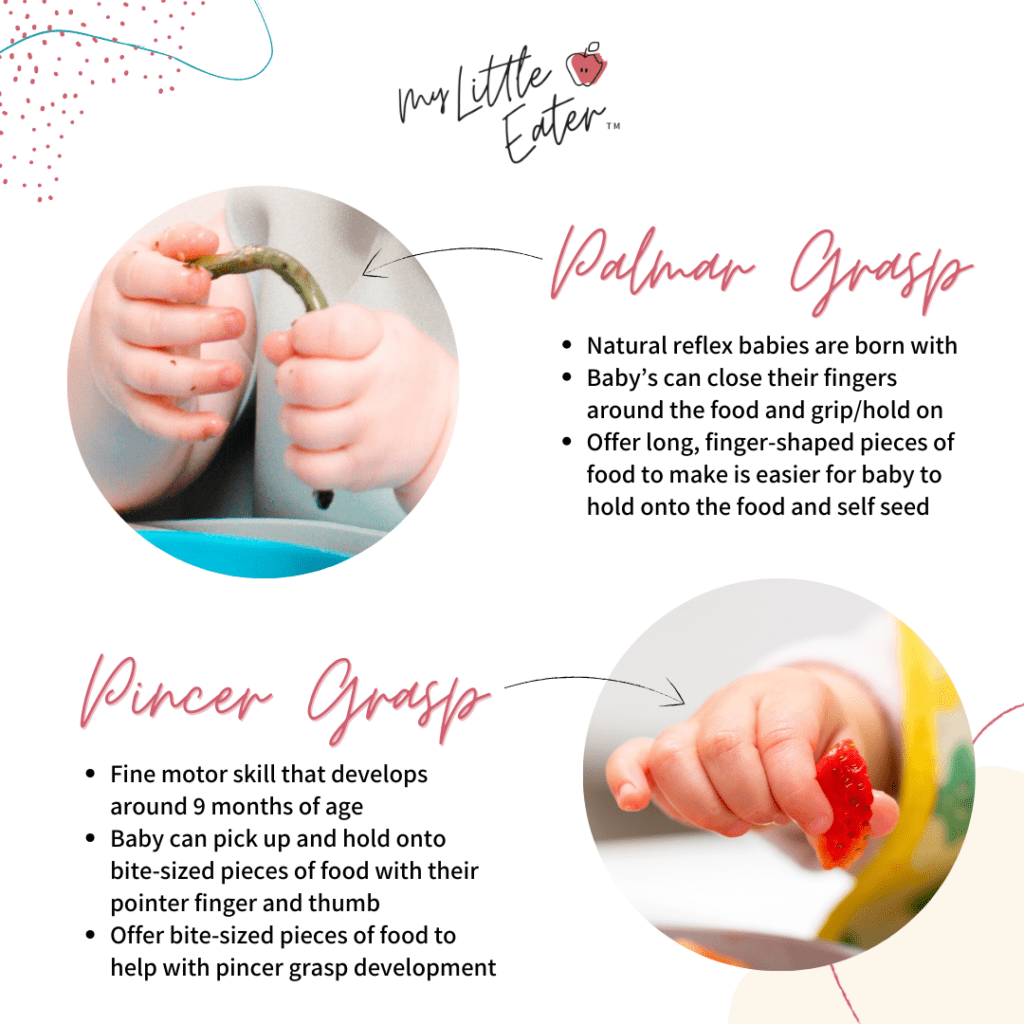
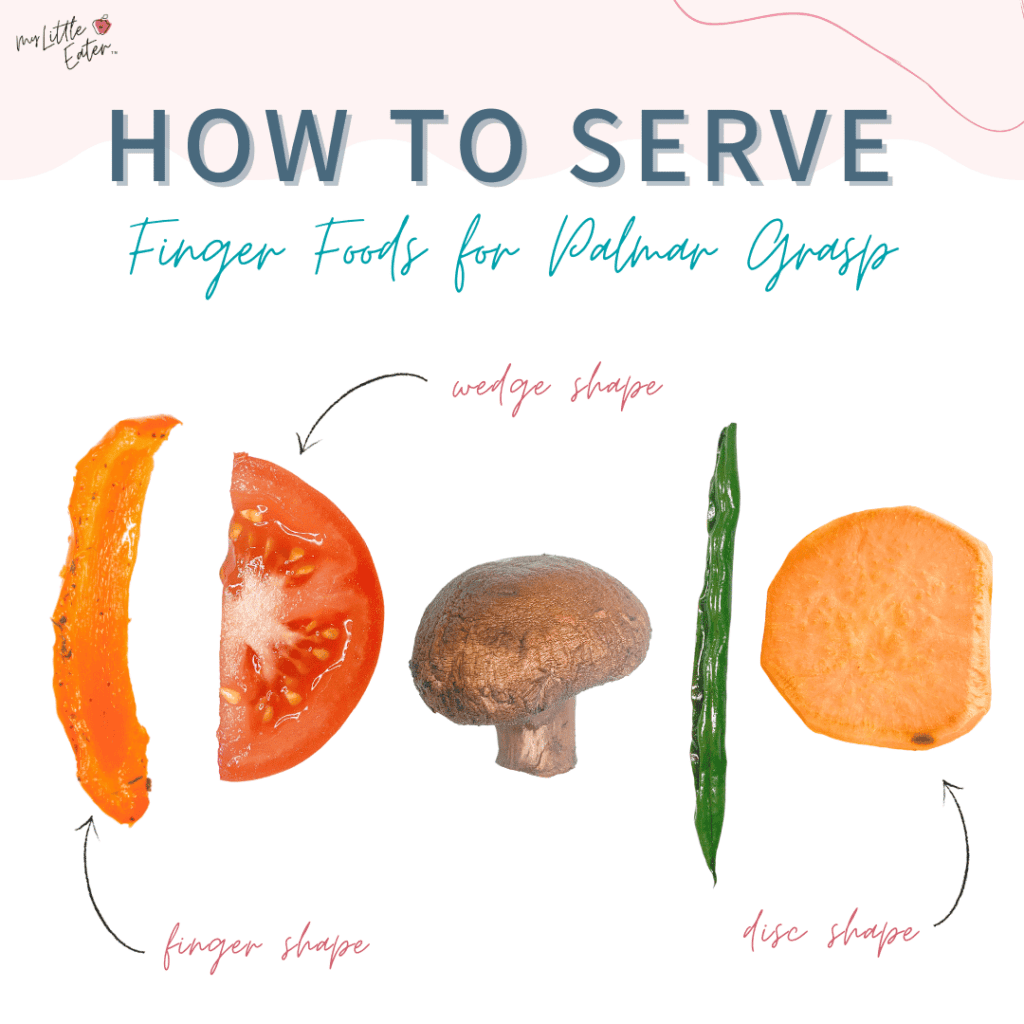
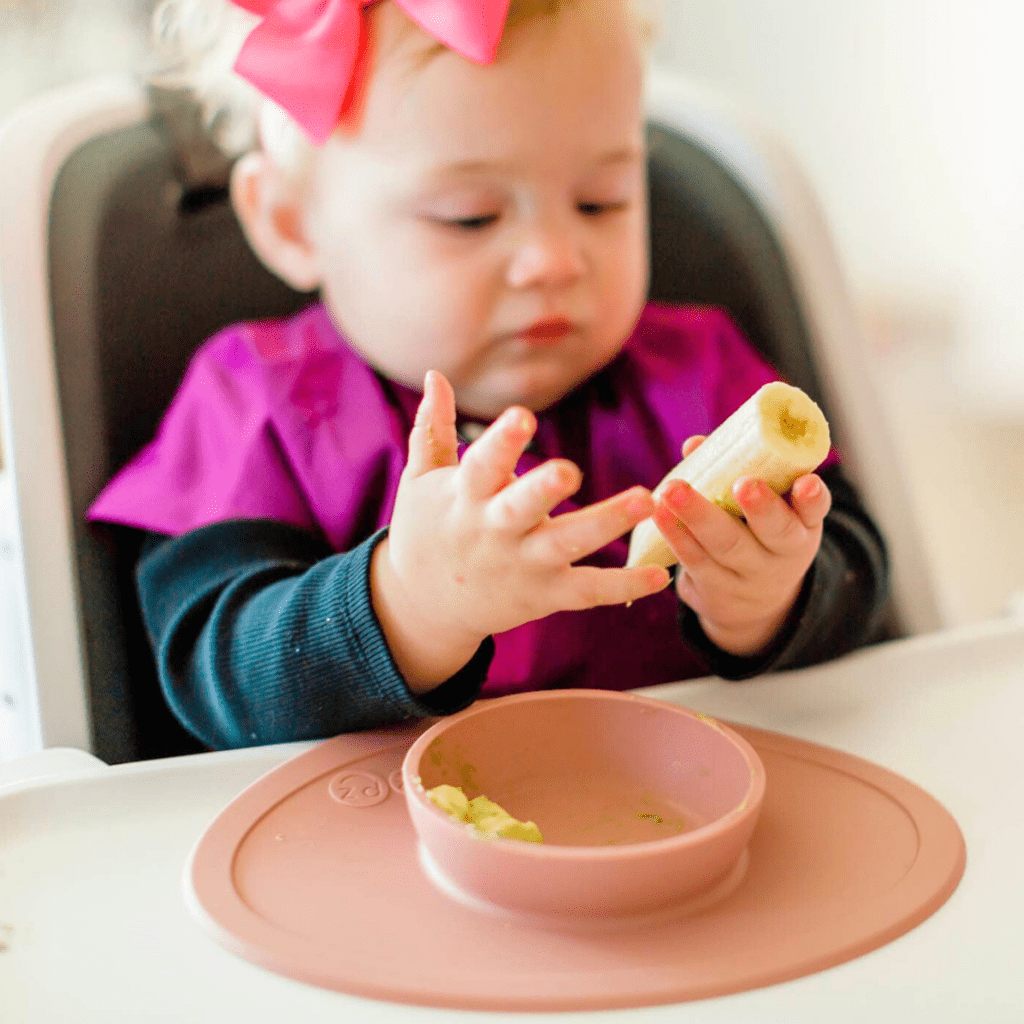
These warm cinnamon apples make a delicious BLW breakfast for your baby and a perfect snack for the whole family! They’re great for introducing and exposing your baby to highly allergenic foods like tree nuts or peanuts. You can choose to roll them in almond flour, ground peanuts, or peanut flour. Not only will this make it easier for your baby to pick up and hold these slippery apples, but it will give them a new flavor and texture experience, too!
5 from 1 vote
Prep Time 5 minutes
Cook Time 10 minutes
Course Breakfast, Dessert, Snack
Cuisine American
Servings 1

Equipment

  • 1 small plate
  • 1 skillet

Ingredients
  

  • 1/2 tbsp unsalted butter (or coconut oil)
  • 1 medium apple
  • 1/4 tsp cinnamon
  • 3 tbsp almond flour

Instructions
 

  • Remove the skin from the apple and cut into wedges approximately ½ inch thick.
  • Warm the butter or oil in a medium nonstick skillet over medium heat.
  • When melted, add the apples. Stir to coat and cook for 10-15 minutes or until soft when poked with a fork.
  • Stir in the cinnamon and let cool.
  • Roll the apple wedges in almond flour and serve to baby as a finger food!

Notes

  • Store in an airtight container in the fridge for up to 4 days. Serve cold or warmed slightly.
  • Use any apples you prefer, though harder, cooking apples work well here. If you choose to use a softer variety, just be aware that they may cook faster than the times given above.
  • If choosing to use butter, remember it's also an allergenic food (dairy) so be sure that at least one of those allergens has been ruled out before combining the two together in this recipe. 
Keyword added sugar free, baby breakfast, baby led weaning recipe, egg free, toddler friendly
Tried this recipe?Let us know how it was!

FIND THIS HELPFUL? PIN IT TO SAVE FOR LATER!

Tips for helping baby pick up slippery foods.
Picture of ABOUT THE AUTHOR

ABOUT THE AUTHOR

CHELSEY LANDRY, RD
Community Dietitian at My Little Eater Inc., and bunny-mom to Hickory. Chelsey offers one-on-one counselling to parents of babies and toddlers that need more customized support. Learn more by booking a free discovery call with her today!

MORE BLOGS LIKE THIS...

SHARE THIS POST

meet edwena

Registered pediatric dietitian, mom of two picky-turned-adventurous eater, and the creator of the Texture Timeline™ – an exclusive tool to help move your baby through easy to more advanced purees and finger foods to prevent picky eating.

You may also like...

115 first foods list for baby

Baby's
115 First Foods
Checklist

60 Day Baby Led Feeding Meal Plan

MLE app preview

My Little Eater App (for apple/android)

scared to transition to finger foods?

Join the FREE workshop

Baby led weaning...but make it purees!

Get our proven, step-by-step plan for transitioning your baby from Purees to Finger Foods, texture by texture, so you can ease your fears about choking and gagging, all while helping your little eater develop their eating skills and an adventurous appetite.

Plus get The Texture Timeline™ Starter Guide for free when you stay until the end of the workshop. This tool breaks down the 4 phases, what kinds of foods to safely feed your baby during each phase, and when to progress to the next phase.

Scroll to Top